Feedback FRACK for Ableton Live
Inspired by Hainbach's video on Pinging, but lacking outboard hardware, I decided to explore creating a feedback device in Ableton Live.
Normally, when you want to build a feedback loop in Live, you would use a Return track set up to feed back to itself, either directly by enabling its own send, or via an Audio Track set up to take input from the Return track and sending some of its output back to the Return track.
While this does work, it's fairly clumsy since there are multiple tracks involved. Creating a new Return track for every experiment you want to have clutters the workspace and there is a physical/mental distance between the device making the initial sound and its feedback loop. I thought that it must be possible, given what Live offers, to have a single device that implements a feedback loop.
Well, I figured it out, and you can download the Feedback FRACK device here. Note that this device was created in Live 11, and will not work in earlier versions. :(
Using the Feedback FRACK
The device gives you control over the feedback loop gain, as well as a protective Limiter device on the output side of the feedback. You should still be careful using this device, since feedback is a dangerous thing and can snap at any second to make terrible noises that may hurt your speakers or your ears!
You can place any effects between the "IN from Dry/Mix" Gate and the "FBack Out Gain" Utility. The rack you downloaded has a Reverb device in the Feedback loop:

Feed audio or place an instrument before this rack, and then fiddle with the "FBack Gain" knob to dial in the right amount of feedback. You can keep the Feedback Chain muted, or unmute it for double the feedback volume without doubling the gain to the feedback loop. Try other effects instead of (or in addition to) the Reverb such as filters, flangers, or whatever else you can think of.
Here's an example of Live's Grand Piano preset put through the default Feedback FRACK. I increased and decreased the Feedback Gain control as the piano plays.
Here is a TR-606 hihat sample played through a feedback loop containing a simple Delay device, while modulating the feedback amount and delay time:
Here's the mostly-stock Operator patch played through a feedback loop with Valhalla Plate then SoundToys FilterFreak (high-pass), while modulating the plate mod depth, decay, filter frequency, and feedback amount:
Finally, a loop I made where the source material was the impulse generated by plugging and unplugging a guitar cable from my audio interface, passed through a feedback loop containing a reverb, recorded then layered three times.
I like to just noodle with different impuluse sounds and feedback / effect settings, while recording audio the whole time. I'll then play back the recording and choose interesting sections or moments for use in other projects. You could also use the recorded MIDI and automation to go back and further refine the delicate settings.
How it Works
It is possible to have a same-channel feedback loop, given what Live offers out of the box. There are two important tools in the Live toolkit that enable this:
- Nestable Audio Effect Racks
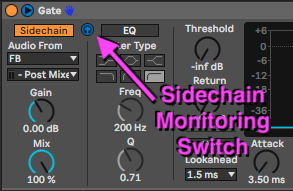
- Devices that offer Sidechain Monitoring like Gate and Compressor
#2 above is the key that unlocks this capability. By using the sidechain monitoring, we can hijack the normal audio path, and bring in audio from ANY source in Live -- be it other channels, or the audio stages of the Audio Effect Rack the device is sitting in. The latter is what we use here.
We will need to use two Audio Effect Racks, nested. The Outer Rack is the main structure of the device, providing a Feedback Chain and a Dry/Mix Chain. Within the Dry/Mix chain is another Audio Effect Rack that has a Feedback-In Chain and a Dry Chain.
The Outer Rack's Feedback Chain contains a Gate device, with sidechain monitoring enabled, set to pull audio from the Inner Audio Effect Rack's Post Mixer signal. This is the feedback input. The signal passes through your choice of effects. The Feedback Chain is muted in the outer rack, since we do not need that signal going out of there, but it's OK to unmute it too.
The control for the feedback amount is in the form of a Utility device, mapped to one of the Rack's knobs. This Utility also has DC Offset removal enabled, since feedback loops can often create large DC offsets.
The Inner Rack's Feedback-In Chain also contains a Gate device with sidechain monitoring enabled, this time pulling audio from the Outer Rack's Feedback Chain, Post FX.
You can trace the Dry signal through this rack by following the black lines toward the bottom of the diagram. The grey lines are audio paths, but they are not used. The feedback loop is illustrated with red lines.
Please let me know if you use this, or have ideas on how to improve it!