Nice backup solution for PFSense => TrueNAS
For the last couple of weeks, I've been nerding out on some home networking stuff. I blame my friend Eric for introducing me to the wonders of TrueNAS and pfSense.
This post outlines how I use TrueNAS to back up my pfSense configuration, and a special trick I used that I feel was cool enough to write about.
Background
TrueNAS is an open-source network attached storage (NAS) system that can run on pretty much any hardware. I use it for centralized, reliable file storage for the house, to host a photo sharing app called PhotoPrism, and the Macs here can see it as a remote Time Machine backup target. I've got an article here dedicated to the details of it.
pfSense is used as a network firewall and router (among other things), and is also open-source. It's great for technology tinkerers like me who find the ISP-supplied cable modem to be too limiting in what you can do. Along with its core firewall and routing duties, I use it as a DHCP server, DNS resolver, dynamic DNS updater, and VPN endpoint (for access to the home network from outside the home).
With all of these use cases, the configuration for pfSense can become fairly elaborate. Keeping a backup of the configuration in case I mess it up or in case the computer running it goes belly up then becomes important.
pfSense has a built-in cloud configuration backup function, but part of my recent exercise is to reduce my reliance on cloud services where it makes sense, so I looked for a solution that keeps the backups inside my home network.
First Steps
The TrueNAS box here felt like a perfect place to start, since it's got triple redundant hard drives and I use it to back up other computers. I started down the path of using a cron job in pfSense to push a timestamped copy of the configuration file (/cf/conf/config.xml) to TrueNAS. I felt like doing this hourly was the right cadence, especially if I needed to revert a bad change.
The XML file containing my current configuration is 50KB, so hourly backups for a year would consume over 400MB, so I felt I'd need a companion job to delete old backups. That's kind of a no-brainer one-liner (find backups/ -ctime 30 -delete on the TrueNAS box), but I would have to set it up on the TrueNAS side, which felt messy to me. I realized I could use the power of the ZFS filesystem in TrueNAS to do something more elegant.
The Trick
ZFS has a wonderful feature called Snapshots. This is a lot like the local Time Machine on a Mac, where you can view your files at different points in time and only files whose contents change consume additional disk space. I have hourly Snapshots enabled for my main TrueNAS pool, so for example if I accidentally delete or overwrite an important document on the shared drive, I can recover it from the prior hour's snapshot. You can also configure a snapshot retention period, which I have set to 2 weeks.

Snapshots only consume space if the contents of a file change ("copy on write"), so there is no significant additional space required if the file doesn't change. Even cooler!
Putting this concept together with the pfSense backup means that I don't need to keep timestamped backup files from pfSense. I can just push the configuration file from pfSense to TrueNAS using the same filename over and over.
Here is the command from the cron job running on the pfSense host:
/usr/bin/scp /cf/conf/config.xml truenas:backups/
Security/Login Setup
I feel it's important that automated tasks between computers follow the "principle of least privilege". Since pfSense is using SCP to transfer its config file to TrueNAS, this is well trodden territory:
- Create a SSH keypair on the pfSense host, along with a
.ssh/configfile to use this key when communicating with TrueNAS. \
[2.6.0-RELEASE][[email protected]]/root: cat .ssh/config
Host truenas
  Hostname truenas.lan
  User pfsense_backup
  IdentityFile ~/.ssh/pfsense_backup
- Create a user on TrueNAS with its shell set to
scponlyand paste the public key from the first step into the space on the user creation screen. Ensure this user is the owner of its home directory (this bit me). The home directory will likely be in the iocage dataset underiocage/home/<user>.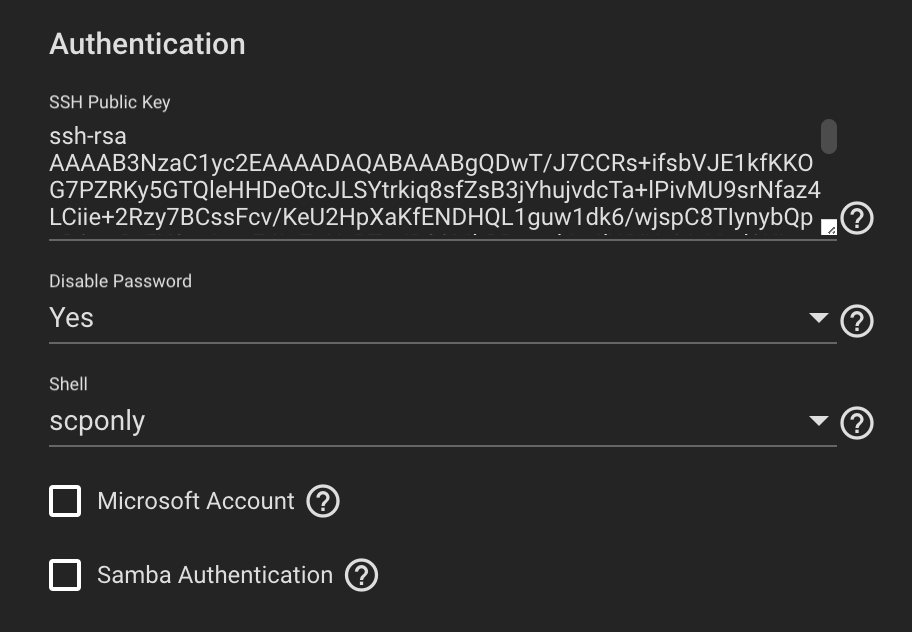
- In TrueNAS, create a directory that your new user can write to in order to hold the backups. I just made a directory called
backupsin the user's home directory. - Install the
cronpackage in pfSense and add your cron job!
Viewing Old Versions of Files in ZFS
Each Dataset in ZFS has a hidden directory called .zfs in the Dataset root. This directory will not show up in an ls -a listing, but you can cd to it.
[email protected] /mnt/data-pool/shared
> ls -la | grep .zfs

[email protected] /mnt/data-pool/shared
> cd .zfs

[email protected] /mnt/data-pool/shared/.zfs
> ls -la
total 25
dr-xr-xr-x+   3 root  wheel    3 Dec 27 03:51 .
drwxrwxr-x+  11 zs    wheel   12 Jan 10 11:45 ..
dr-xr-xr-x+ 337 root  wheel  337 Jan 21 14:01 snapshot
The snapshot/ directory contains a subdirectory for each snapshot.
[email protected] /mnt/data-pool/shared/.zfs/snapshot
> ls -la | head -10
total 8208
dr-xr-xr-x+ 337 root  wheel  337 Jan 21 14:01 .
dr-xr-xr-x+   3 root  wheel    3 Dec 27 03:51 ..
drwxrwxr-x+  11 zs    wheel   12 Jan  7 11:30 auto-2023-01-07_15-00
drwxrwxr-x+  11 zs    wheel   12 Jan  7 11:30 auto-2023-01-07_16-00
drwxrwxr-x+  11 zs    wheel   12 Jan  7 11:30 auto-2023-01-07_17-00
drwxrwxr-x+  11 zs    wheel   12 Jan  7 11:30 auto-2023-01-07_18-00
drwxrwxr-x+  11 zs    wheel   12 Jan  7 11:30 auto-2023-01-07_19-00
drwxrwxr-x+  11 zs    wheel   12 Jan  7 11:30 auto-2023-01-07_20-00
drwxrwxr-x+  11 zs    wheel   12 Jan  7 11:30 auto-2023-01-07_21-00
So you can just cd into one of those directories, and view/copy the old version of a file! This is how you would recover an old/working copy of the pfSense configuration file.
Wrap Up
I thought this was a cool example of using the properties of one system (ZFS) in a surprising way to solve a problem that comes up all the time in system administration. Doing it like this feels much more like "going with the flow" than the deliberate steps of writing and purging timestamped files. What do you think? [email protected]